

MCP Connectors
This article shows you how to connect another tool to EmailShepherd, choose what AI agents can do with it, and use it in AI chat.
MCP Connectors let your Build Agents work with information in other tools you use. They use MCP (Model Context Protocol), an open standard many tools support. For example, with a connector you could ask:
- “Pull my campaign brief from Notion and build an email based on it.”
- “Find our spring sale banner in Cloudinary and use it as the hero image.”
This is different from using EmailShepherd from an AI tool such as Claude. For that, see How to use EmailShepherd from your AI tool.
Add a connector
Section titled “Add a connector”EmailShepherd has ready-made connectors for some popular tools. You can also add any other tool that has an MCP server.
Add a ready-made connector
Section titled “Add a ready-made connector”- In the sidebar, click Connectors.
- Select the MCP Connectors tab.
- Click Browse Connectors.
- Click + beside the tool you want to connect, such as Notion, Canva or Cloudinary.
- If the tool asks you to sign in, sign in and allow access.
Add a custom connector
Section titled “Add a custom connector”- In the sidebar, click Connectors.
- Select the MCP Connectors tab.
- Click Create custom MCP Connector.
- In Name, enter a name for the connector, such as the name of the tool.
- In URL, enter the address of the tool’s MCP server. You can find this in the tool’s documentation. It must start with
https://, and you can’t change it later. - If the tool’s documentation says you need your own OAuth app, open Advanced settings and enter the OAuth client ID and OAuth client secret. When you create the OAuth app in the tool, use this callback URL:
https://api.emailshepherd.com/mcp_oauth/callback. - Click Create MCP Connector.
- If the tool asks you to sign in, sign in and allow access.
EmailShepherd supports MCP servers that use OAuth to sign in, or that don’t need you to sign in.
Choose which tools agents can use
Section titled “Choose which tools agents can use”An MCP server offers a set of tools, such as “search pages” or “create page”. All tools are turned off when you add a connector, so agents can’t use the connector until you turn some on.
- In Connectors > MCP Connectors, click the configure icon beside the connector.
- Under Tools, turn on the tools agents should be able to use.
Turn on only the tools you need. Agents work better with fewer tools to choose from. For building emails, tools that look things up are usually enough, rather than tools that make changes in the other tool.
If the tool list is empty or out of date, click Sync Tools.
The connector is now available to everyone in the workspace.
Use a connector in AI chat
Section titled “Use a connector in AI chat”-
Open an email in the editor, then open AI chat.
-
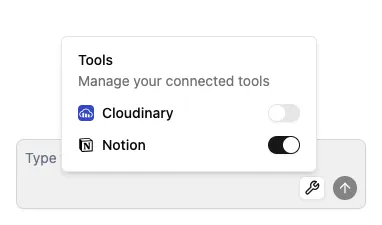
Click the tools (wrench) icon beside the message box.
-
Turn on the connector.
-
The first time you turn on a connector, sign in to the tool and allow access. Each person signs in with their own account, so the agent can only see what you can see in that tool.
-
Ask the agent to use it, for example “Get the brief from the Spring launch page in Notion”.
Each time the agent wants to use one of the connector’s tools, you’re asked to Approve or Reject it.
Delete a connector
Section titled “Delete a connector”- In Connectors > MCP Connectors, click the configure icon beside the connector.
- Under Delete MCP Connector, click the delete button.
- Type the connector’s name to confirm, then confirm the deletion.