

How to set up an AWS S3 CDN connector
This article shows you how to set up an AWS S3 CDN connector, and how to use it when you export an email.
By default, images in your emails are served from the EmailShepherd CDN. With a CDN connector, EmailShepherd uploads your images to your own S3 bucket when you export an email, and changes the image URLs in the email to point to your CDN.
The connector only exports images from your image library. Images you’ve added by URL keep their original URL.
Before you begin
Section titled “Before you begin”You need:
- An S3 bucket to export images to.
- A URL that serves the files in that bucket publicly, such as a CloudFront distribution (e.g.
https://d1234abcd.cloudfront.net) or your own domain (e.g.https://cdn.yourbrand.com). - An IAM user with an access key, and these permissions on the bucket:
| Permission | Why it’s needed |
|---|---|
s3:ListBucket | EmailShepherd checks it can access the bucket when you save the connector. |
s3:PutObject | EmailShepherd uploads your images to the bucket when you export. |
Create the connector
Section titled “Create the connector”- In the sidebar, click Connectors.
- Click CDN Connectors.
- Click Add CDN connector.
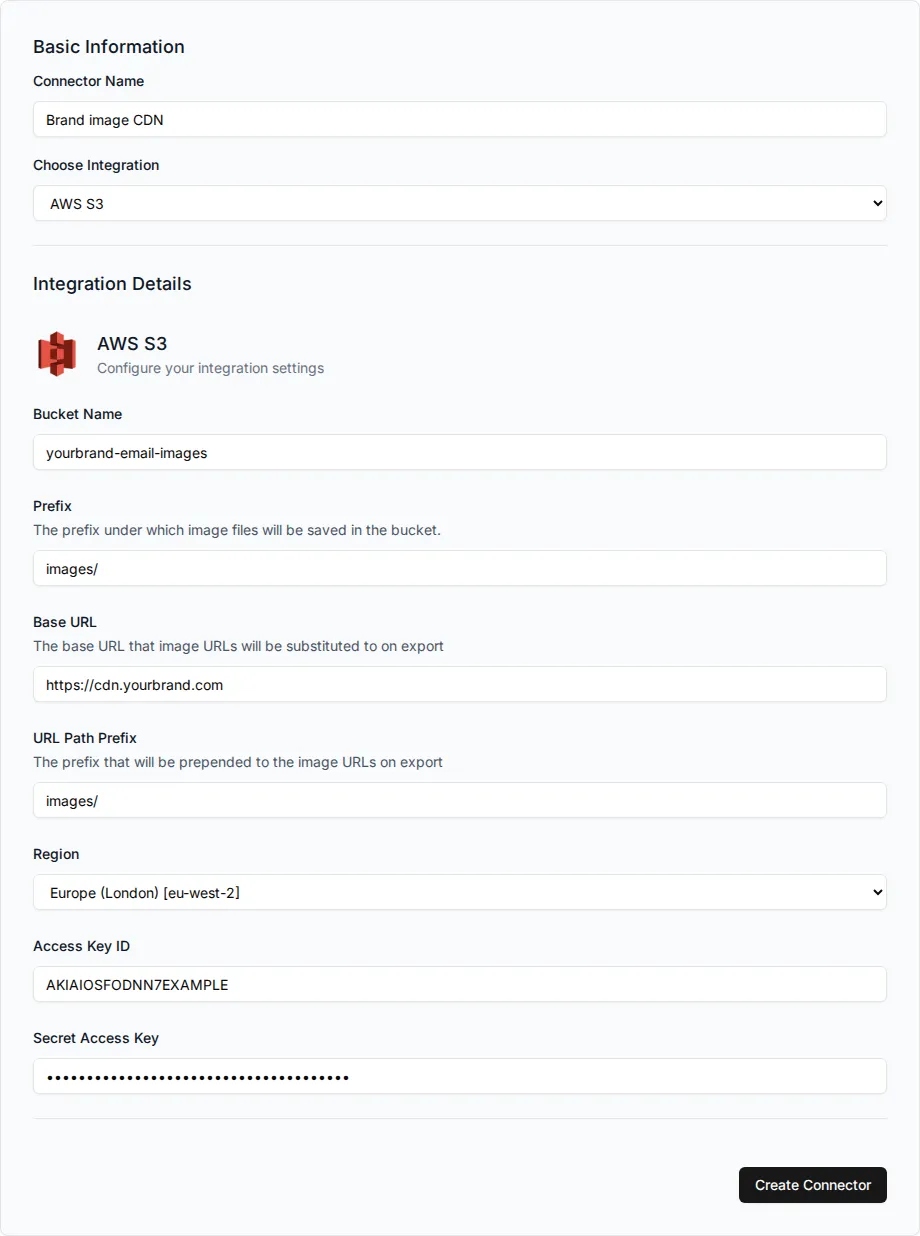
- In Connector Name, enter a name your team will recognize, e.g. “Brand image CDN”.
- In Choose Integration, select AWS S3.
- Fill in the bucket details:
- Bucket Name: the name of your S3 bucket.
- Prefix (optional): the folder in the bucket to save images in, e.g.
images/. - Region: the AWS region your bucket is in.
- Fill in the URL details. See How image URLs are built for an example.
- Base URL: the URL that serves files from your bucket, e.g.
https://cdn.yourbrand.com. - URL Path Prefix (optional): the path to add after the base URL. This is usually the same as Prefix, but can be different depending on how your CDN is set up. If you’re not sure, check with your infrastructure team.
- Base URL: the URL that serves files from your bucket, e.g.
- Fill in your IAM user’s credentials:
- Access Key ID
- Secret Access Key
- Click Create Connector.
How image URLs are built
Section titled “How image URLs are built”When you export an email, each image URL is built from your Base URL, your URL Path Prefix and the image’s file name. For example, with these settings:
| Setting | Value |
|---|---|
| Base URL | https://cdn.yourbrand.com |
| URL Path Prefix | images/ |
An image with the file name abcd-efgh-ijkl-mnop.jpg gets this URL:
https://cdn.yourbrand.com/images/abcd-efgh-ijkl-mnop.jpgEach image keeps the same file name every time it’s exported, so an image used in several emails is only stored once in your bucket.
Use the connector when you export
Section titled “Use the connector when you export”- Start an export of a published email, and choose the export type.
- In Image hosting, select Use a CDN Connector.
- In CDN Connector, select your connector.
- Click Start export.
